How Do You Control Solar Street Lights?
Sep 16, 2025
Solar street lights, with their advantages of zero electricity charges and low emissions, have been widely applied in municipal roads, rural streets and alleys, park courtyards and other scenarios. However, many users have found that the battery life and lighting effect of the same type of solar street light vary significantly in different scenarios. The core reason lies in the adaptability of the "control technology".
The control function is not merely about "turning lights on and off", but rather about precisely regulating the entire process from the charging of photovoltaic panels, battery storage to the discharge of lights, to achieve "lighting on demand". The control technology of modern solar street lights has been upgraded from traditional manual operation to a diversified solution featuring the collaborative operation of remote controls, sensors and wireless intelligent systems.
This article will systematically disassemble the control center, mainstream control methods, common operation Settings and practical operation skills of solar street lights, helping readers select the optimal control scheme based on scene requirements and maximize the energy-saving value and service life of the equipment.
Solar Street Light Controllers Functions and Form Differences
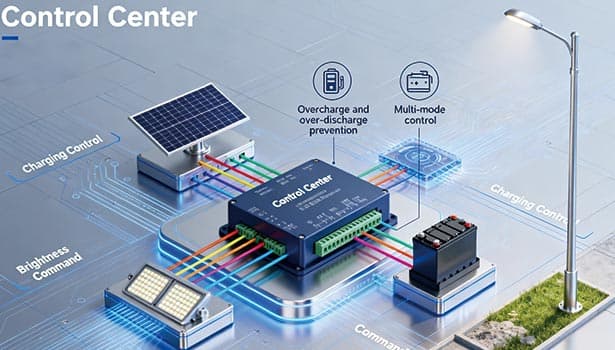
All the control functions of solar street lights are realized by the controller, which is like the "brain", connecting the photovoltaic panels, batteries and LED lights, and leading the energy conversion and lighting regulation.
Responsibilities of the Controller
Charging management: Adjust the charging current and voltage to prevent overcharging and overdischarging from damaging the battery.
Lighting control: Receive manual, remote control and other signals to adjust the on/off, brightness and mode of the lights.
Comparison of Controller Forms
|
Form Type |
Advantages |
Disadvantages |
|
Built-in controller integrated solar street light |
Compact structure; strong dust-proof and waterproof properties |
Maintenance requires disassembling the light head/battery box |
|
External controller split-type solar street light |
Easy to maintain without disassembling core components |
Must ensure the maintenance door is well sealed and waterproof |
4 Solar Street Lights Control Methods
According to the complexity of application scenarios and operational requirements, the control methods of solar street lights can be classified into four major categories, covering all scenarios from simple regulation of a single light to centralized management of multiple lights.
Manual Adjustment
Manual adjustment is the most fundamental control method. Parameters of the controller are directly set through physical switches, which is suitable for scenarios with a small number of installations and fixed lighting requirements.
Applicable scenarios and models:
Mainly compatible with split-type solar street lights, commonly seen in areas with less human activity such as rural paths and farmland protection zones. This type of scenario has low requirements for control flexibility and does not need frequent Settings adjustments.
Specific operation procedures and precautions:
First, open the inspection door on the light post (for external controllers) or remove the light cap (for internal controllers), and find the physical buttons such as the "Setting key" and "Brightness Adjustment key" on the controller.
Press the corresponding keys as needed. For example, press the "On" key to force the light to be turned on, and press the "Brightness" key to switch between 50% and 100% brightness modes.
After the operation is completed, the inspection door should be closed or the light cap reinstalled to ensure proper sealing.
Manual adjustment must be carried out when the power is off (some new models support operation while powered on, but insulating gloves must be worn) to avoid the risk of electric shock. Moreover, each adjustment requires on-site operation and is not suitable for remote or high-pole light scenarios.
Remote Control
Remote control is a standard feature of current mid-to-high-end solar street lights. It sends instructions to the controller via wireless radio frequency signals to achieve close-range non-contact operation and is compatible with most integrated and split models.
Compatible models and core functions
Integrated solar street lights, due to their compact structure, are generally controlled by remote controls. If a split-type street light adopts an intelligent controller, it can also be equipped with an additional remote control. The core functions of the remote control include:
Mode selection: Switch between modes such as "constant on", "sensor on", and "Timed on";
Time setting: Set the light to remain lit for 4 hours, 6 hours or 8 hours after it is turned on;
Brightness adjustment: Precisely set brightness levels such as 10%, 30%, 50%, 70%, and 100%;
Forced switch: Forcibly turn on or off the light in an emergency.
Operational advantages and usage precautions
The greatest advantage of the remote control is that it "does not require touching the device". It can be operated within a range of 3 to 5 meters below the light post, which is especially suitable for high-pole lights (over 6 meters) or scenarios where the inspection door is located at a higher position.
When in use, please note: The remote control must be "paired" with the controller before use (some are factor-paired). When the battery power is insufficient, it will cause the signal to weaken. The button battery needs to be replaced in time. Avoid using in environments with strong electromagnetic interference (such as near substations) to prevent command failure.
Human Body Sensing Control
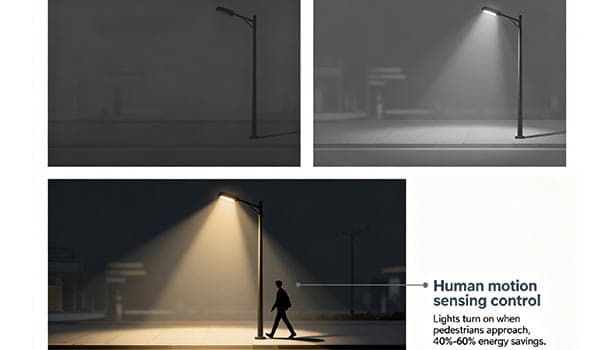
Human body sensing control detects moving objects in the environment through built-in motion sensors (infrared or microwave sensors), achieving automatic adjustment of "lights on when people come and lights off when people leave", which is the most effective control method for energy conservation.
Sensor types and detection principles
At present, there are two mainstream types of sensors: infrared sensors achieve sensing by detecting the infrared rays emitted by the human body. They have strong anti-interference ability but a relatively narrow detection Angle (about 120°). Microwave sensors detect the movement of objects by emitting microwave signals. They have a wide detection range (with a radius of 5 to 10 meters), but are easily disturbed by wind and grass. Most street lights adopt dual-mode sensors of "infrared + microwave", which take into account both accuracy and range.
Operation logic and energy-saving effect
The default logic of inductive control is:
When there are no moving objects, the light maintains illumination at a low brightness of 10% to 30% (or is directly turned off).
When detecting activities such as people or vehicles, the brightness will automatically increase to 100% within 0.5 seconds.
After the moving object leaves the detection range, it will return to low brightness within 30 seconds to 5 minutes (the duration can be adjusted).
This mode can reduce battery consumption by 40% to 60%. For instance, a street light with a battery life of 8 hours can be extended to 12 to 16 hours after being controlled by sensors, making it particularly suitable for road lighting during low-traffic periods such as the early morning and late night.
Wireless/Intelligent Control
Wireless intelligent control is an advanced solution for large-scale installation scenarios such as municipal roads, industrial parks, and large scenic spots. It realizes centralized management of multiple lights through wireless communication technologies (LoRa, NB-IoT, 4G) and is a core component of smart municipal construction.
Technical Principles and System Composition
This system consists of three parts: "terminal equipment (street light controller) + communication module + cloud platform"
Each street light's controller is equipped with a wireless communication module to collect real-time data such as battery power, light intensity, and light status.
Data is transmitted to the cloud platform via a low-power network, allowing users to view the operating status of all devices on their computers or mobile apps.
Administrators send instructions on the platform (such as adjusting the lighting time and brightness), and the instructions are fed back to the controller through the network to achieve remote control.
Core Competencies and Practical Applications
Centralized regulation: Simultaneously adjust the operation modes of hundreds of street lights, for instance, uniformly set the street lights on municipal main roads to "turn on at dusk and adjust to 70% brightness at 2 a.m."
Fault Warning: When the battery voltage of a certain street light is too low or the light malfunctions, the platform immediately sends out an alert to avoid blind spots in manual inspection.
Data statistics: Automatically generate monthly power consumption, lighting duration and other reports to provide data support for energy-saving optimization;
Scene linkage: It can be linked with traffic lights and surveillance cameras. For example, the street lights at intersections will automatically increase their brightness during peak traffic hours.
Comparison of Control Methods for Solar street lights
|
Control Method |
Core Principles |
Applicable Scenarios |
Core Advantages |
Key Points of Operation |
|
Manual adjustment (physical switch) |
Directly set controller parameters by manually adjusting the switch |
Rural roads, farmland watch areas (low population density) |
Cost-effective, low failure rate |
Requires power-off operation; on-site inspection door opening or light cap removal needed |
|
Remote control (RF signal) |
Wireless radio frequency signal transmission command |
Community courtyards, high-pole lights (where convenient operation is required) |
Non-contact operation within 3–5 meters |
Must pair with controller; avoid strong electromagnetic interference |
|
Infrared/microwave sensor |
Detects moving objects through human body sensing |
Community walkways, parking lots (dispersed pedestrian flow) |
Saves 40%–60% of energy |
Avoid installation near frequently swaying trees |
|
Wireless intelligent control (LoRa/NB-IoT) |
Connects to cloud platform for centralized regulation and fault early warning |
Municipal main roads, industrial parks (large-scale installation) |
Remote management of multiple lights via computer/mobile app |
Requires stable network connection |
How to Customize the Solar Street Lights Operation Mode As Needed
No matter which control method is adopted, it ultimately needs to be implemented through specific "operation Settings". The following four common Settings can be used separately or in combination according to the scene requirements to achieve a balance between "lighting needs and energy-saving goals".
Time Control
Time control is achieved by setting a fixed "light on/off time" or "lighting duration" to realize the timed operation of lights. It is suitable for scenarios with stable lighting requirements and regular foot traffic.
2 setting methods
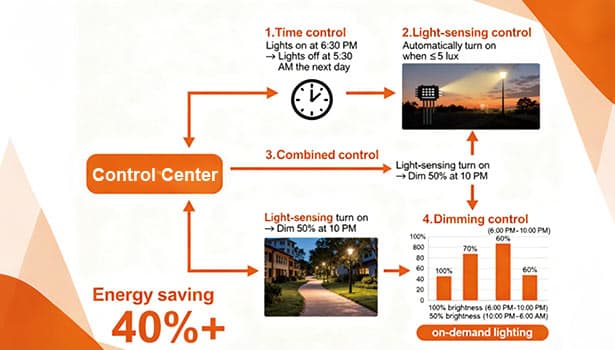
Fixed time setting: Directly set the specific times for turning the lights on and off, for example, "Turn on the lights at 18:30 and turn them off at 5:30 the next day."
Duration setting: Set the duration for which the light remains on after being turned on, for example, "The light will remain on for 8 hours after being turned on at dusk and then automatically turn off."
Applicable scenarios and precautions
This setting is suitable for areas such as secondary urban roads and main roads in residential communities where the daily lighting periods are relatively fixed. However, it should be noted that the fixed time Settings need to be adjusted according to the seasons (for example, turn on the lights at 19:00 in summer and 17:00 in winter), otherwise problems such as "the lights are on before it gets dark" or "the lights are not on when it gets dark" may occur. The duration setting should be matched with the battery capacity to avoid the lighting time exceeding the battery's endurance.
Light Sensing Control
Light-sensing control is the "default basic setting" of solar street lights. It detects the ambient light intensity through the built-in photoresistor of the controller to achieve "automatic on at dusk and automatic off at dawn", without the need for manual intervention.
Working mechanism and threshold setting
The photoresistor will preset a "light intensity threshold" (usually 5-10lux, equivalent to the intensity of natural light at dusk or dawn). When the ambient light intensity is lower than the threshold, the controller instructs the light to turn on. When the light intensity exceeds the threshold, instruct the light to turn off and switch to the charging mode.
Core strengths and limitations
Its greatest advantage is that "no manual adjustment is required", which can precisely adapt to the natural law of day and night alternation and avoid the deviation of the timing of turning on and off the lights caused by seasonal changes. However, its limitation lies in the fact that the brightness cannot be adjusted. It can only achieve "all on/all off", and the energy-saving effect is limited. Usually, it needs to be used in combination with other Settings.
Combined Control
Combined control combines "light sensing" with "time regulation", taking into account both automatic start and stop as well as energy-saving control. It is one of the most commonly used operation modes at present.
Typical combination scheme
Option One: Light-sensing light on + time dimming - At dusk, the light-sensing light turns on (100% brightness), automatically adjusts to 50% brightness after 2 hours, and turns off the light-sensing light at dawn the next day.
Option Two: Light-sensing on lights + Time-sensitive off lights - Light-sensing on lights at dusk, remaining on for 6 hours and then automatically turning off (regardless of whether it is bright or not), suitable for rural roads with very few people at night.
Advantages and applicable scenarios
The combination control not only solves the problem of "light sensing cannot be dimmed", but also avoids the trouble of "frequent adjustment of time control", and is extremely flexible. For instance, the community walkways can adopt a "light-sensing lighting on + dimming after 10 p.m." solution, which not only meets the lighting needs during the evening walking peak but also saves battery consumption in the dead of night.
Dimming Control
Dimming control achieves brightness adjustment by reducing the power output of the light. The core objective is to "save energy during off-peak hours", extend battery life and the lifespan of the light.
Dimming mode and brightness selection:
The current mainstream dimming technology is PWM (Pulse Width Modulation), which achieves brightness changes by adjusting the on-off frequency of the current. It has no flicker and causes no damage to LED lights. The common brightness Settings are 30%, 50%, 70%, and 100%, which can be set according to the scene requirements
Peak hours with high foot traffic (18:00-22:00) : 100% brightness;
During periods of low foot traffic (22:00-5:00 the next day) : 30%-50% brightness;
Dawn transition period (5:00-6:00) : 70% brightness.
Energy-saving effect and applicable scenarios
Data shows that when the brightness of lights is reduced by 50%, energy consumption can be lowered by more than 40%, and battery life can be extended by nearly double. This setting is suitable for all scenarios, especially for small solar street lights with smaller battery capacity (such as garden lights). The dimming control can significantly avoid the problem of "power failure in the middle".
Practical Skills for Controlling Solar Street Lights
Correct control operations can not only achieve energy-saving goals but also extend the service life of batteries and controllers. The following three major techniques need to be given special attention:
Must-Read Product Manual
The operation logic and parameter range of the controller vary among different brands and models of solar street lights. For example: For some controllers, the "Brightness adjustment key" can be briefly pressed to switch gears, and long-pressed to enter the timing mode. The detection angles of some sensors can be physically adjusted according to the manual guidance.
Therefore, before operation, it is necessary to read the product manual carefully, with a focus on three parts: the controller wiring diagram (avoid connecting the positive and negative poles), the parameter setting table (such as the charging voltage threshold, the power corresponding to the dimming gear), and the troubleshooting guide (such as the problem indicated by the flashing indicator light). Do not rely on "general experience" for operation, otherwise it may cause the controller to burn out or the battery to be damaged.
Monitor the Battery Status
The core protection function of the controller is "battery charge and discharge management", but it is necessary to ensure that the controller can accurately detect the battery status. Two points need to be noted in practical operation:
Regularly check the battery voltage
Detect the voltage value of the battery through the display screen of the controller or a multimeter. The normal voltage range for lead-acid batteries is 12V-13.8V, and for lithium batteries, it is 3.2V-3.6V per cell (multiple cells connected in series need to be stacked). If the voltage remains persistently below the lower limit, it may indicate that the controller has failed in detection and needs to be replaced promptly.
Avoid forced discharge
When the battery power drops below 20%, some controllers will automatically cut off the power supply of the light (enter "protection mode"). At this time, do not forcibly press the switch to turn on the light, otherwise it will cause over-discharge of the battery and shorten its service life.
Adjust According to the Season
For systems that adopt "time control" or "combined control", Settings must be adjusted during the change of seasons. The specific suggestions are as follows:
Spring (March to May) and autumn (September to November) :
The duration of day and night is close. It can be set as "light-sensitive lights on + continuous lighting for 8 hours" or "lights on at 18:00 and off at 5:00 the next day".
Summer (June to August) :
Days are longer and nights are shorter. It can be set to "turn on the lights at 19:00 and turn them off at 4:30 the next day", or "light-sensitive lights on + keep them on for 7 hours".
Winter (December to February):
The days are short and the nights are long, and the light intensity is weak (low charging efficiency). It is necessary to set the lights to "turn on at 17:00 and turn off at 6:00 the next day", and at the same time, turn on the "adjust the light to 50% after 22:00" function to prevent the battery from running out prematurely.
It is recommended to complete the adjustment one week before the change of solar terms, for example, to adjust the autumn Settings before the Autumnal Equinox (September 23rd).
There is no "optimal solution" for the control technology of solar street lights, only "most suitable" - different scenarios require the selection of appropriate solutions based on installation scale, flow patterns, and budget costs. For users, there is no need to pursue the "most advanced control technology", but rather to sort out their own needs through the methods in this article, so that the control functions can precisely match the lighting scenarios. This is the key to the energy conservation and efficient operation of solar street lights.